Three Cheese Macaroni

Comfort Food: Lasagna

BBQ Grilled Cheese

Pork Sandwiches

Showing posts with label Dinner. Show all posts

Three Cheese Macaroni

Tuesday, July 30, 2013


There's this thing called cheese. The vegetable drawer in my fridge holds no vegetables. It's completely packed with cheese. Always. That being the case, my mac 'n cheese is never the same - because I always use a trio of different cheeses. This one was pretty darn good though... and my daughter couldn't get enough of it. Mothers - this is for you.


Three Cheese Macaroni


Serves at least 6

1lb dried elbow noodles
1 cup shredded smoked Gouda
1/4 cup Mascarpone
1 cup shredded Mozzarella
Salt and Pepper to taste
2 Tablespoons butter
1 Tablespoon flour
1 cup chicken broth

Cook noodles according to directions on the box.

While noodles are doing their thing, get out a medium sauce pan and melt the butter on medium heat. Add the flour and stir until fully mixed in and lumps have disappeared. Stir in the chicken broth and cook until mixture thickens slightly (about 3 minutes).

Take the mixture off the heat and add the mascarpone. Once stirred in, slowly add the Gouda and mozzarella, continually stirring.

By now, those noodles should be cooked perfectly and drained. Add those noodles to your medium saucepan mixture and stir up all the goodness. It should be cheesy.

Sprinkle some ground black pepper on top to serve. Enjoy with a tall glass of cold milk.


The Classics: Lasagna

Sunday, April 7, 2013


I can't resist a good lasagna. I've never followed an actual recipe for this comfort food, so it's nearly impossible for me to repeat a favorite. But that's the fun of it. Whatever you have around the kitchen, add it to your lasagna. Seriously. I've added pumpkin puree, eggplant, cottage cheese, goat cheese... maybe it doesn't sound that ridiculous, now that I think about it.


I'm also a little obsessed with trying everything in a cast iron pan. There's something so rustic about pulling a meal out of the oven and placing it on a giant wooden cutting board in the middle of your dinner table. It makes me smile. And that's what makes me weird. I accept that. I have about 5-6 different sizes of cast iron pans, so if there's only two of us eating - I use the small pan. No leftovers. Boom.

As I said, I usually don't follow a recipe for lasagna, but I'm going to share this one with you. I may never make it this way again - simply because I've had it, I want to try a new one next time.

Ooh! But the great thing about this particular recipe, is that you have enough ingredients to freeze a meal. Yeah - more for later.


Three Cheese, Two Meat Lasagna

1lb ground beef
1lb ground pork
1 jar marinara
1 box bake-ready lasagna noodles
4+ cups shredded mozzarella
4oz garlic and herb chevre
8oz ricotta
1 egg
1 box frozen spinach, thawed and drained (so no longer frozen)
salt
pepper

1 9-inch cast iron pan
1 bread pan

Directions

In a large fry pan on medium heat, brown the ground beef and pork together. Once browned, dump in the jar of marinara and stir.

While meat is browning, combine chevre, ricotta, egg, spinach, salt and pepper in a large bowl. Taste at your own risk (raw egg is involved).

Set meat sauce and cheeses aside.

Preheat your oven to 350 degrees Fahrenheit.


Next, get out your lasagna noodles and place a layer at the bottom of your cast iron pan (this recipe can also be used for a 9x13 pan, or whatever pan you prefer, as long as it's oven safe). It's not going to look pretty, but don't worry - it'll be covered with meat and cheesy goodness. No one will notice - unless you take a picture and blog about it.

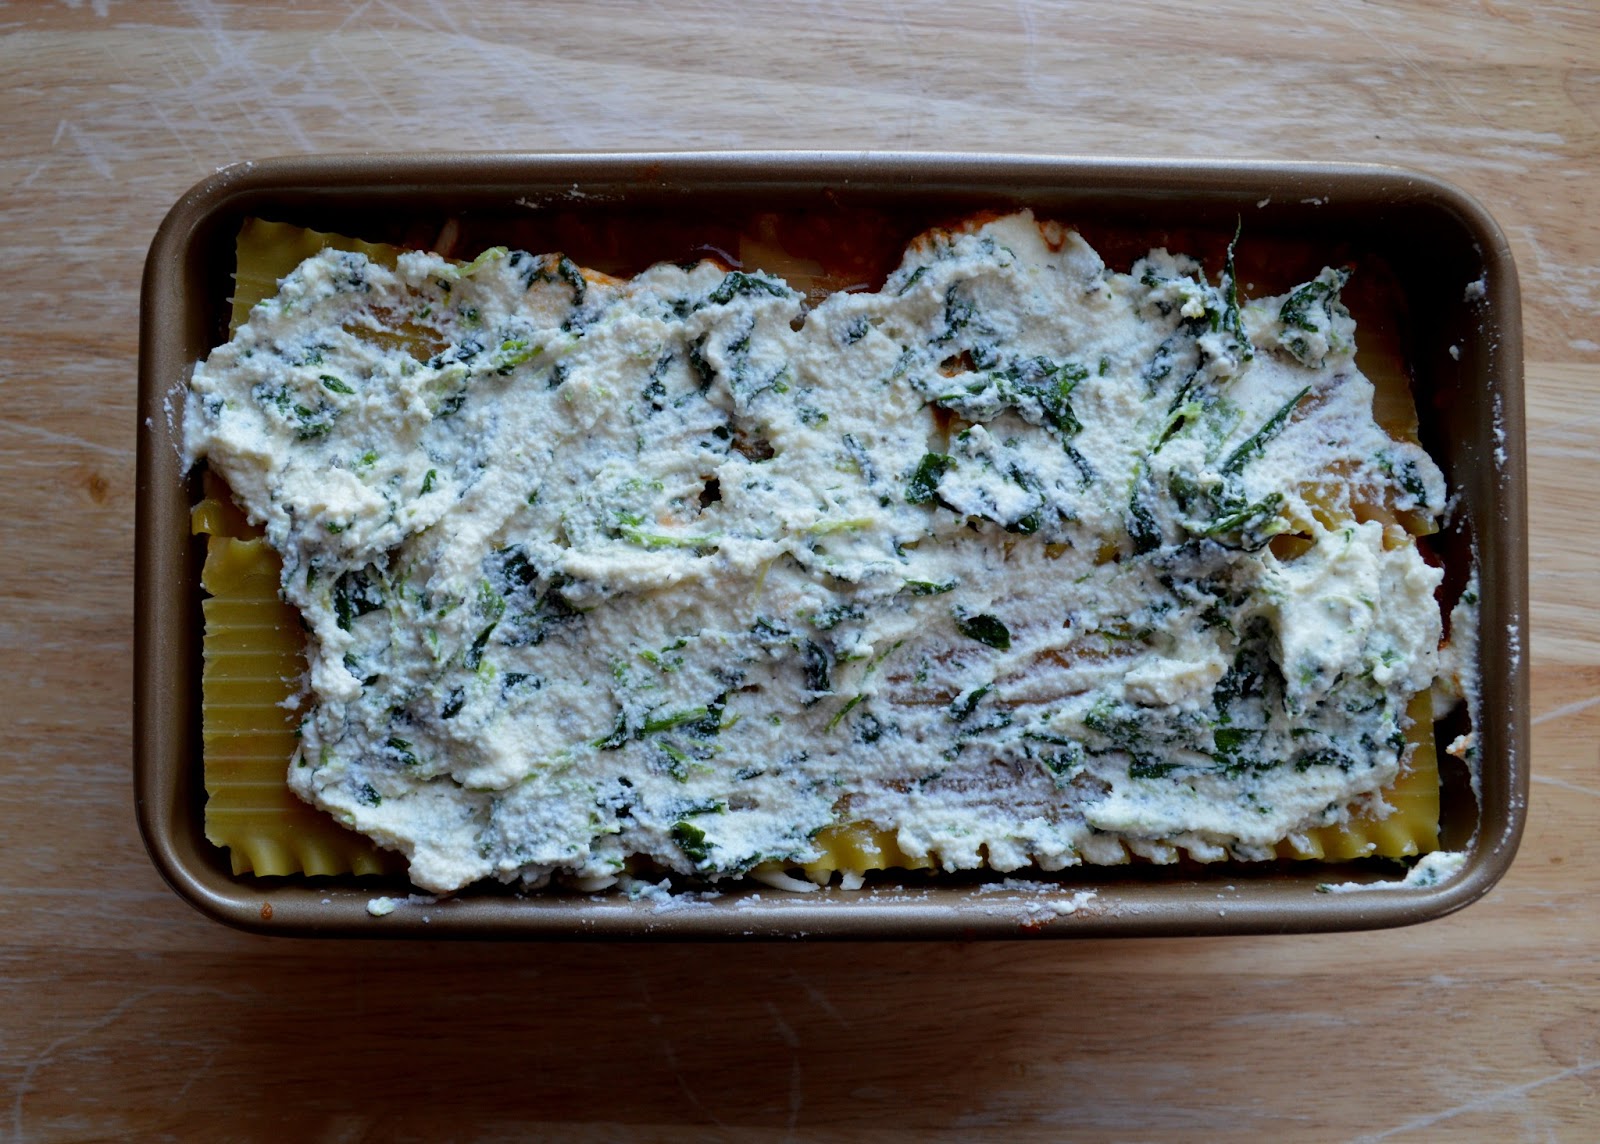
Now, spread on a good layer of the cheesy mixture. You might have to use your hands to get it to spread evenly, that's ok - just be sure to wash them.

The meat layer comes next, followed by a layer of shredded mozzarella. Lay down another layer of noodles and go through the motions of layering for about 3-4 layers. *Note - you will have extra filling if using a 9inch cast iron pan. Fill up that bread pan with a mini lasagna, wrap it in plastic wrap, then foil and toss it in the freezer for a later time. Be sure to take off the plastic wrap before baking it though - that could be bad.


Notice that I didn't finish the top with a bunch of shredded mozzarella. That's because you need to bake the lasagna with foil on top for the first 40 minutes. I'd hate for you to lose all of that cheese to the foil. After 40 minutes has passed, take off the foil, layer the top with shredded mozzarella and bake for an additional 10-15 minutes, or until the top cheese has melted and browned slightly. I'd also recommend placing a cookie sheet on the rack below your lasagna in the oven. Just in case. (I like to put these notes later to see who reads the recipe before starting it). 

Once the final timer goes off, announce that dinner is ready and have that wooden board placed in the middle of your dining room table. This stuff is best served hot and gooey.


What's your favorite way to make or serve lasagna?

Parmigiano Reggiano Chicken and Waffles

Friday, September 21, 2012


If you're obsessed with watching cooking channels, you'll totally know what I'm talking about here. If not, this might be a new concept. It's chicken and waffles. Together. Married together with sweet, sticky honey.
It's delicious.

I was sold when dining out in North Carolina and got served this giant Belgian waffle with two pieces of perfectly crusted chicken and honey on the side. The girl across the table from me was like 'OMG - I could never eat all of that'. My pregnant-self said to self 'watch me'. And yes, I ate the whole meal and it was wonderful. My husband was impressed. At least - I think he was?

My urge to recreate this masterpiece has been intense lately and well, I had to find a way to incorporate cheese. Because I always need to find a way to incorporate cheese into my dishes. It took a little tweaking, but I got it. I got it good.


The trick? Finely grated Parmigiano Reggiano. Lots of it. It adds a saltiness and a savory edge to the waffles. And the chicken? Who doesn't love deep-fried chicken? With cheese.

I'll stop writing now and get to the goodness:

Parmigiano Reggiano Crusted Deep-Fried Chicken

Serves 2

1 pound chicken drumsticks and wings, skin on

2 cups buttermilk
1/2 cup shredded Parmigiano Reggiano cheese
3/4 cup all-purpose flour
1 tablespoon Italian seasoning
1/4 teaspoon black pepper
2 eggs, beaten
3-5 cups vegetable or peanut oil, for frying

In a large saucepan, place chicken and cover with milk. Over medium-high heat, bring milk to a boil, then lower heat to a medium-low. Simmer the milk until the chicken is cooked through entirely, about 30 minutes. Once cooked through, transfer chicken to a cooling rack and allow to cool for about 15-20 minutes. Pat dry using a paper towel.

While waiting for chicken to cool, heat the vegetable oil in either a deep fryer or Dutch oven on high heat to about 325*F.

Combine shredded Parmigiano Reggiano cheese, flour, Italian seasoning and black pepper in a large zip bag. Have the 2 beaten eggs in a medium bowl, set aside.

Place the pieces of chicken in the bag, close and shake until the chicken is completely coated (this is where kids can help). Dip the coated chicken into the beaten eggs, one at a time. Place the chicken back into the dry mixture and shake for one last coating.

Carefully place each piece of chicken into the 325*F oil and fry until the crust turns golden in color, about 1 minute per side. Remove from oil and place on the cooling rack, lined with a paper towel.

Serve hot.


Whole Wheat Parmigiano Reggiano Waffles

Makes about 6, 8-inch waffles

1 cup all-purpose flour
1 cup whole wheat flour
1 cup finely grated Parmigiano Reggiano
1/2 teaspoon baking soda
1 teaspoon baking powder
1/2 teaspoon salt
1/2 teaspoon black pepper
2 tablespoons sugar
3 eggs, separated
2 tablespoons butter, melted
2 cups buttermilk, room temperature

In a large bowl, combine all of the dry ingredients and mix until fully combined. In a second medium-size bowl, beat together the egg yolks, melted butter and buttermilk until well blended. Combine the two mixtures and stir just until combined. Do not over mix!

In a third bowl, beat egg whites until they form medium stiff peaks. Gently fold into the waffle mixture. Trust me, this part is worth it.

Turn on your waffle iron to a medium-high heat. Coat the inside with butter.

Once the waffle iron is ready, pour about 3/4 cup of the waffle mixture in and close. Wait patiently for your fluffy waffle to cook.

If preparing in advance, have your oven set to 200*F and place cooked waffles on a cookie sheet in the oven. Not only will they crisp up a little more, but they'll be warm.

Serve with Parmigiano Reggiano Crusted Chicken Drummies drizzled with buckwheat honey.

The Annual Fish Fry

Thursday, March 1, 2012


Each year for the past... 10 years? At least. Our family friends come over for a fish fry. My Mom makes sure the house is cleaned up, heads in the barn for chores with my Dad and when they come in a few hours later, the house is filled with the aroma of soup, warm bread and fried fish. Actually, the garage smells the most of deep fryer as it does for the next five days, but it's worth it. Did I forget to mention that the kitchen island is now full of at least 10 bottles of wine? 


The fish fry is typically a group effort. Our family friends bring all of the food and cleaned up fish (that they also fished/hunted) - but we all pitch in where we can. This year, I got to be the shaker. Shake 'n Bake wasn't used, but I was tempted to say the well-known line a few times. It was a pre-made breading that makes the fish taste delicious. Enough said.


Where the magic happens.


Pheasant and Wild Rice soup


Figgy Pudding anyone?


Spending time with friends and family is always a treat, but when you can share your time while eating delicious food - it's even better. I look forward to this event every year and always come with a very empty stomach!

Tempura for my Valentines

Tuesday, February 15, 2011


The February 2011 Daring Cooks’ challenge was hosted by Lisa of Blueberry Girl. She challenged Daring Cooks to make Hiyashi Soba and Tempura. She has various sources for her challenge including japanesefood.about.com, pinkbites.com, and itsybitsyfoodies.com.  

Sadly, I couldn't find soba noodles at my grocery store, so I ended up buying a Pad Thai kit and made that along with my tempura. Had I not just moved half way across the country, I would have considered making the noodles myself - another day.

This was the first meal I made in our new apartment. I mean come on - what's better than deep frying food in a newly cleaned place? Fortunately, it was about 50*F outside all day, so I had the window wide open to prevent a total grease-fest.  Tempura is simply a Japanese dish of deepfried vegetables and seafood. I used the typical frozen shrimp you can find at your grocery store - but I would recommend Tiger shrimp. It's much bigger and tastes great (what you'd typically find at a Japanese restaurant). I chose broccoli, carrots and sweet potatoes for my vegetables. I had recently tried some sweet potato tempura in Northampton, MA and thought it was great - so I knew that would be a good choice.

To prepare the vegetables for frying, either boil or steam them ahead of time so they become tender, but not mushy. I boiled mine for about 5 minutes (10 minutes for the sweet potato) and then quickly rinsed them in cold water and stuck them in the fridge. 

Frozen shrimp can be defrosted by simply soaking them in hot water. I bought pre-cooked shrimp, so they were 'ready-to-eat' once thawed. If you buy raw shrimp, it will fry long enough to cook all the way through.

When making tempura, everything must be cold, except the frying oil. 

Once the vegetables are cooled, smother them in flour and then return back to the refrigerator. The flour will allow the batter to stick better to the vegetables.  Do this with the shrimp also.

Next, heat up your deep fryer, or pour oil about an inch deep in saucepan.  Heat the oil to 350*F.  Next, get out a plastic dish to prepare your batter in and a larger, deep dish to hold an ice-water bath. Since we just moved, we hadn't filled the ice trays with water yet - so I improvised with my mini ice pack. 

It's best to get all of the ingredients ready before mixing them together in order to keep everything as cold as possible. It's also important to only mix the batter so much - it should be runny and lumpy.

Ingredients:

1 egg yolk from a large egg 
1 cup iced water
½ cup plain (all purpose) flour 
½ cup cornflour or cornstarch
½ teaspoon baking powder

Place the iced water into the plastic bowl. Lightly beat the egg yolk and gradually pour into the iced water, stirring (preferably with chopsticks) and blending well. Add flours and baking powder all at once, stroke a few times with chopsticks until the ingredients are loosely combined.  The batter should be runny and lumpy. 

Place the bowl of batter in the ice water bath to keep it cold while you are frying the tempura. The batter as well as the vegetables and seafood have to be very cold. The temperature shock between the hot oil and the cold veggies help create a crispy tempura.

You can now start frying your vegetables and shrimp.  Start with the vegetables, such as sweet potatoes, that won’t leave a strong odor in the oil. Dip them into the batter.  Slide them into the hot oil, deep frying only a couple of pieces at a time so that the temperature of the oil does not drop.

Place finished tempura pieces on a wire rack so that excess oil can drip off. Continue frying the other items, frequently scooping out any bits of batter to keep the oil clean and prevent the oil (and the remaining tempura) from getting a burned flavor.

If you are making a lot of tempura, place them on a cookie sheet in a 250*F oven to keep them crispy and warm until you are done frying.

Serve immediately for the best flavor, but they can also be eaten cold (but I don't recommend it).

I served the tempura with my cold Pad Thai noodles (made from a kit - easy to find in your grocery store and delicious) along with a small dish filled with green onion and soy sauce for dipping.

From what I could tell, my guests loved the meal. The broccoli and sweet potatoes were a big hit, as were the noodles. Tanoshimu! (enjoy!)

I made small chocolate cheesecakes for dessert - post to follow!

 Happy Valentine's Day!

Cheesy Baked Rigatoni

Tuesday, February 1, 2011


I get daily text messages at about 3:00 from Martha Stewart with the Recipe of the Day. My husband loves it {sarcasm}. Mostly because I announce the Recipe of the Day to everyone around me, so there's no avoiding it if I'm around. If I like the recommended Recipe of the Day, I can reply 'cook' and it will text me the shopping ingredients and email me the recipe. It's really quite wonderful. This is where my Cheesy Baked Rigatoni came from though, it was originally called Baked Spaghetti and Mozzarella, before I got to it.

The great thing about this recipe is that you can change it up and it's still going to turn out great; as long as you follow some of the basics. Feel free to click on the original recipe above, but this is how I would do it. 

*Caution: This is enough for a week's worth of leftovers for 3 people. If you don't want to make so much, cut the recipe in half.

Cheesy Baked Rigatoni
Serves 6-8

2 boxes dried pasta
1 larger-than-average jar of pasta or marinara sauce
1 ball or log of fresh mozzarella, cubed
5 slices of bacon, cut into small pieces
1 cup shredded Parmesan or Gruyère
Oregano (dried or fresh)

Directions

Cook pasta just before it becomes 'ready' - it will still have a little crunch to it. Drain in a strainer, but do not rinse. Sauce sticks better to un-rinsed pasta.

Preheat oven to 350*F

In a large dutch oven or oven-proof saucepan, fry bacon until crisp. Pour in tomato sauce and stir until boiling. Dump in cooked pasta and stir until fully incorporated. Toss in the cubed mozzarella and stir once more.  Top with shredded cheese and place in the oven. Bake for 20 minutes or until cheese is bubbly and browned on the edges.

With potholders, carefully take out the cheesy goodness and sprinkle with the oregano.  Serve with garlic bread and a tall glass of milk.

Turkey Pot Pie

Wednesday, January 12, 2011


It's the perfect season for soups, chili and pot pies. My sister emailed me this morning saying, "Make a good recipe for chicken pot pie today.  With easy crust 'cause I don't want to go buy anything.  How about that?  [My co-worker] has been talking about a chicken pot pie she made and how good it was." 

So that's what I did. I created a turkey pot pie that didn't involve any extra grocery shopping. It turned out surprisingly well. The best part is, you can make it how ever you want. If you like onions, throw'm in. How about beans, sure! Why not? Want enough for 4 people? Throw more in! Ok, I'm done.  Here's what I did:

Alise's Make-Shift Turkey Pot Pie
Makes 2

Ingredients
1 turkey breast, thawed
1 cup frozen peas
1 cup frozen corn
1/2 cup leftover potato, cut into bite-sized chunks
1 can mushrooms
2-3 cups leftover beef broth
3 T flour
1 cup milk
4 T butter
2 T oil
Salt & Pepper
1/2 sheet puff pastry
1 egg white


Directions
Get out a medium sauce-pan and a medium fry-pan. Set each on a medium-low burner.  In the sauce-pan, add 2 T butter and let melt.  In the fry-pan, add the 2 T oil.

When pans get hot, add the turkey breast to the fry-pan and the following ingredients in the sauce-pan: peas, corn, mushrooms.  Cover the sauce-pan with a lid and let veggies thaw.

Watch the turkey breast closely and cook thoroughly on both sides.  Once done, set on a plate to cool. Turn the heat off from the veggies.

Keep the sauce-pan on the stove and add the remaining 2 T of butter. Once the butter is melted, mix in the flour entirely. Gradually pour in the beef broth, followed by the milk. Let boil and cook until thickened, like gravy. Add salt and pepper to taste.

Pre-heat oven to 350*F.

Now that the turkey breast has cooled, shred it, using two forks or your hands. Add to the veggie mixture, along with the cut up potatoes.

Add the gravy to the veggies and turkey and stir together. Set aside.

Get out two large ceramic bowls or soup mugs that are oven proof. Lightly grease and set on a baking sheet. Take out puff pastry and cut into two large circles - big enough to over-cover your bowl/mug by about 1/4 inch. Lather with egg white on one side and have on stand-by.

Equally divide your gravy-veggie mixture into the two bowls.  Place the puff pastry over the top of each bowl, egg-side down. Tuck the dough under - around the bowl, in order to seal the deal.  Lather with more egg white and cut a slit on the top of each pie.

Place in the oven for 20 minutes, or until the crust has turned golden brown.  Let cool before serving, as they'll stay hot for at least 10-15 minutes after they come out of the oven.

Enjoy!

The Best Taco Pizza of 2011

Tuesday, January 11, 2011

I've been having really bad luck lately when it comes to preparing meals. I'll think of something to make, but then come to find out that I'm missing like - half of the ingredients. Over the weekend, I was going to make spaghetti and meatballs (having just watched Bobby Flay's Throwdown), but I didn't have any spaghetti. Then, I decided to make Swedish meatballs, because I knew I had one of those seasoning packets for it. So I have the meat in the bowl along with the breadcrumbs, open the packet (that says SWEDISH MEATBALLS).  The inside of the packet says TACO SEASONING. What the!?!? Great. Now I HAVE to make them from scratch. They ended up tasting very good, but I ended up working myself harder that day than originally planned. Hmph.

So I get home from work and have no idea what to make. We're all starving (my husband, house-mate and I) and we just want something to eat now. Fortunately, we had pizza crust. So we were off to a good start. We start shouting out ideas that might sound good on pizza crust - and this is what we came up with. The best darn taco pizza you'll ever have. Seriously. It's that good. And for all of you mommas out there - it's fun for the kids too!  

Here's how it's done:

123 Taco Pizza

4 T yellow cornmeal
1 roll of Pillsbury pizza crust, regular or deep dish
2 T olive oil
1 jar mild salsa
1/2 can refried beans
1/4 packet taco seasoning
3/4 lb ground beef
4 T chopped red onion
1 c. shredded cheddar cheese
2 c. chopped lettuce
2 handfuls of broken chips (we had Tostitos new Olive/Artisan chips)
sour cream

Directions

Preheat oven to 350*F

In a fry pan, brown hamburger along with the taco seasoning. I just sprinkle the seasoning over the beef as it's browning.

On a large cookie sheet, sprinkle yellow cornmeal evenly.  Spread out the pizza crust on the pan as evenly as possible. Drizzle with olive oil and place in the oven.  Bake for about 8 minutes.

In the mean time, chop up the vegetables, set aside. Spread out all measured ingredients on the counter so you're ready for action.

When the pizza crust is ready (just ever-so-slightly browned) take out of the oven and place on a hot pad near your ingredients.  Spread the refried beans first, followed by the salsa, browned beef, than the onions.  Cover the entire pizza with the cheddar cheese, than place back in the oven for about 10 minutes.

Once the cheese is fully melted, turn on your oven broiler and heat up the pizza until the cheese starts to bubble (I love watching cheese bubble up).  Take out of the oven and place back on the hot pad on your counter.

Toss the lettuce evenly over your pizza and finish it off with the broken-up chips. Cut out even squares and dollop a Daisy.

*The refried beans add this crazy texture that you don't typically expect from a taco pizza. It's also good when dipped in Ranch dressing.

My Shrimp Fix

Wednesday, January 5, 2011


Tonight was unique. We had plenty of food in the fridge/freezer, but we couldn't use the stove or oven. See - our gas company decided to not show up yet... and we're down to 5%. Let's hope I add enough blankets to my bed tonight. Argh! 

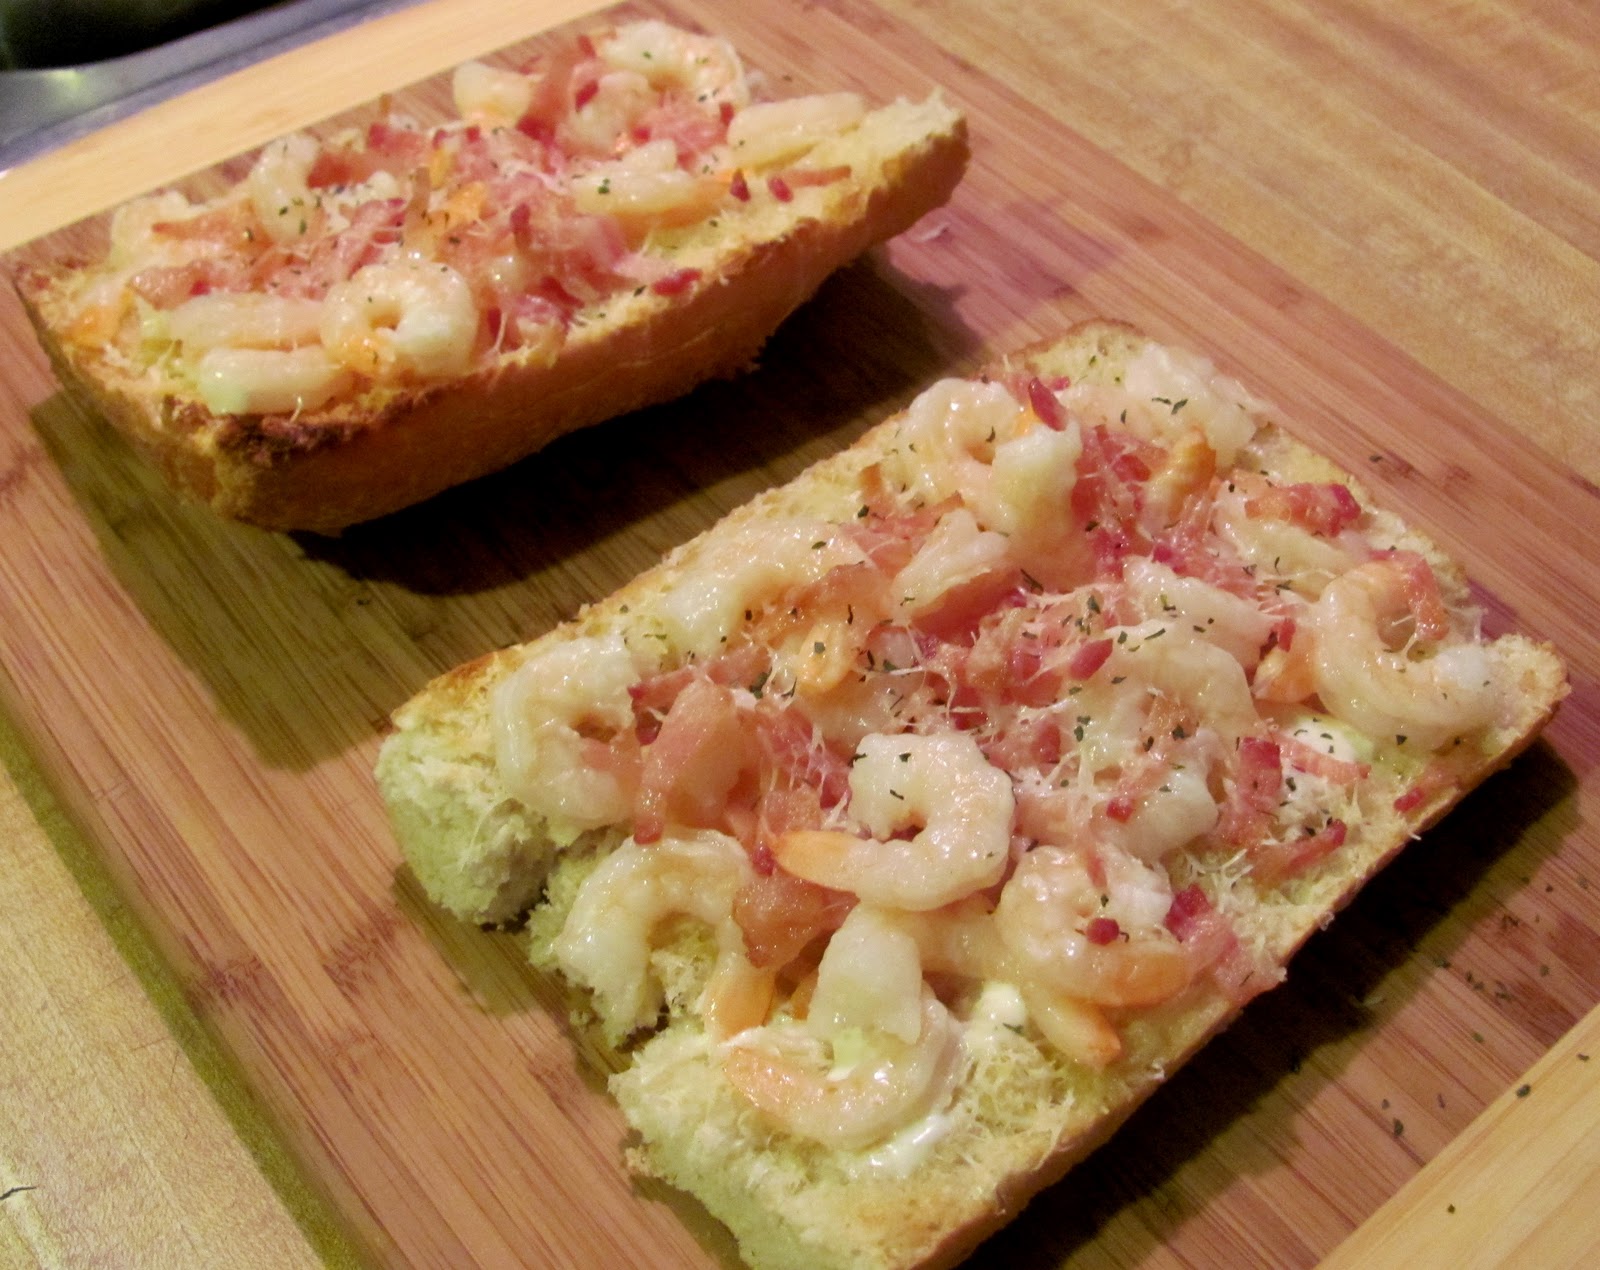
The benefit to this is that my husband and I get to think of a unique way to use our toaster oven with the food we have available (aka not yet thawed).  We ended up creating a thick garlic bread full of buttered shrimp and bacon. It was awesome. Shrimp is really easy to thaw out in some hot water (though I had to be careful not to use too much hot water - or I'd use up that 5% quickly). Bacon is quickly 'fried' in the microwave and cheese is always in abundance in our house. This should probably be more of an appetizer, but it was our dinner - and we liked it.

The Shrimp, Bacon and Ranch
Serves 2-4

1/2 loaf ciabatta bread, cut in half (like a bun)
2 T butter, softened
Garlic Salt, to taste
1 bag (14oz) frozen shrimp, deveined, de-tailed, thawed in hot water
2 T butter
4 slices of cooked bacon, cut into 1/4in slices
1 cup shredded Parmesan cheese
2-4 T ranch dressing
1 T dried oregano, for garnish

Spread 2 T butter on bread, sprinkle on 1/2 cup of the cheese and dust with garlic salt. Place the two slices of bread in your toaster oven, turned on broil (this can also be done in your oven broiler). Broil for about 3-5 minutes, or until the edges begin to brown slightly.

In the mean time, heat up the remaining 2 T of butter in the microwave. Pour the butter onto your shrimp, stir and set aside.

Take bread out of the oven.  Lather half of the ranch dressing on each slice of bread. Divide the shrimp and bacon equally and layer on each piece of bread.  Sprinkle with the remaining cheese.

Place back in the oven, on broil, for another 3-5 minutes - or until the cheese has melted.  Take out the bread and garnish with the oregano.  Cut each slice in half for dinner-size or into fourths for appetizer-size.

*If you'd like, you could cut up the shrimp into smaller pieces for easier biting.

Mom! The Meatloaf!

Sunday, October 3, 2010

I've had the last four days completely to myself. Apart from the fact that I've watched too many scary movies in my childhood that I'm easily freaked out, it was a very relaxing few days. I've 'Octoberized' our house and was able to watch Food Network for hours, uninterrupted. Heck, I even went shopping for a day. That doesn't happen very often anymore. I no longer live within 10 minutes of 5 different malls; one including the Mall of America. You mean I actually have to drive 45 minutes to the mall!? What is this world coming to? Well, it's teaching me that I don't need to go shopping very often, because I actually have plenty of clothes and don't really have the disposable income to just shop. Who'd a thunk it?

Where am I getting with this? Well, my husband came home this afternoon and at his request, I needed to have some food ready when he and our friend Adam arrived. Some people would get upset with this kind of request. Who do you think you are? Stop at McDonald's on the way home! I actually enjoy the opportunity to come up with something to make and to have more than one or two people to enjoy it with. I also had plenty of time to plan.

Since I promised you chocolate cake made with zucchini, that will be included in this post; along with mini meatloaf.  I LOVE meatloaf and haven't had it since I lived at home, so I'm bringing it back to life! It's cheesy, promotes both the beef and pork industries and it doesn't take long to bake. Let's not forget the awesome aroma that it brings to your house. I also whipped up some mashed sweet potatoes, made just like regular mashed, but with some color.  I'm feeling the Octoberness now.

My mom always told me to enjoy some dessert first, just in case you eat too much that you're not hungry enough for it later. So I'm going to give you the chocolate cake recipe first:

Chocolate Zucchini Cake


1/2 cup (1 stick, 4 ounces) butter 
1/2 cup (3 1/2 ounces) vegetable oil
1 3/4 cups (12 1/4 ounces) granulated sugar
1 teaspoon vanilla 
1 teaspoon baking soda
1/2 teaspoon baking powder
1/2 teaspoon salt
2 large eggs
1/2 cup (4 ounces) sour cream, buttermilk, or yogurt 
2 1/2 cups (10 1/2 ounces) King Arthur Unbleached All-Purpose Flour
3/4 cup (2 1/4 ounce) Dutch-process cocoa
2 teaspoons espresso powder, optional but tasty
2 cups shredded zucchini (about one 10" zucchini, about 12 ounces) 
1/2 cup (3 ounces) chocolate chips
1 cup (6 ounces) chocolate chips, for icing
Preheat the oven to 325°F. Lighlty grease a 9" x 13" pan. 

In a large mixing bowl, cream together the butter, oil, sugar, vanilla, baking soda, baking powder, and salt. Beat in the eggs.

Stir in the sour cream, buttermilk, or yogurt alternately with the flour. Then add the cocoa and espresso powder, mixing till smooth. Finally, fold in the zucchini and 1/2 cup chocolate chips.

Spoon the batter into the prepared pan. Bake the cake for 30 to 35 minutes, till the top springs back lightly when touched, and it seems set. Slide the cake out of the oven, sprinkle it evenly with the 1 cup chocolate chips, and return it to the oven for 5 minutes, [note - don't use frozen chocolate chips. They won't melt properly - or didn't for me anyways...] or until a cake tester inserted in the center comes out clean. Remove the cake from the oven, and use a cake spatula or rubber spatula to spread the chocolate chips into a smooth glaze. Cool on a rack. Yield: 24 servings.

You'll never guess that there is zucchini in this cake. I promise. It simply provides a moist context and allows you to get rid of some of that zucchini that won't stop growing in your garden. 

I used plain yogurt for this recipe. If I make it again, I'm going to try the sour cream. I think it would add a little more flavor and complexity that the plain yogurt didn't bring. Regardless, I'd be using some form of dairy product. And that makes me happy.

Next - the meatloaf.

Cheesy Mini'Me's

1 cup ketchup
1 1/2 teaspoons Dijon or Whole Grain Maple mustard
1 tablespoon brown sugar
1 pound hamburger
1 pound ground pork
1 cup onion, finely chopped
1/2 cup plain bread crumbs
1 teaspoon salt
1 teaspoon oregano
1/4 teaspoon black pepper
2 eggs, beaten
1/2 cup Maple Smoked cheddar, cubed

cooking spray

Instructions

Spray 1 1/2 muffin pans with cooking spray (18 spots). Preheat oven to 350*F.

Combine ketchup, mustard and brown sugar in a medium bowl. Set aside. 

In large mixing bowl, combine hamburger, pork, onion, bread crumbs, salt, oregano, black pepper and eggs. With clean hands, dig in and make sure everything is evenly distributed. Wash hands.
With a spatula, mix in 3/4 of the ketchup/mustard/brown sugar mixture with the meat mixture. 

Evenly distribute mixture amongst the 18 muffin spots (anyone have a better word for those?).  Using your thumb or a spoon, put a dimple in the middle of each mini-loaf. Place a cube of cheese in the middle and cover.  Once that is complete, use the remaining ketchup/mustard/brown sugar mixture and top each mini-loaf with about 1/2 tsp - 1 tsp's worth.

Toss muffin pans in the oven and bake for about 30-40 minutes. Test one of the mini-me's to make sure they are no longer pink in the middle.

Enjoy with some mashed sweet potatoes or regular mashed potatoes. The smokiness of the cheese and sweet/tangy'ness from the mustard makes these mini'me's warm your insides.  I'm excited to eat the leftovers at work tomorrow.

You're My Zucchini Pie

Tuesday, September 21, 2010

My co-worker gave me two giant zucchini a few weeks ago. One of them is 4 1/2 pounds. Literally. After making dinner tonight, I still have one left, so expect a few more zucchini recipes out of me in the next few weeks.

Another co-worker, Debbie, gave me a recipe for Zucchini Pie. I've altered it a little, but it's pretty good. I'm always a little hesitant with zucchini; working on the daring part.

You're My Zucchini Pie

1 cup pancake mix
1/2 cup chopped onion
1/2 cup sliced mushrooms
1/2 cup shredded cheddar cheese - I used Grafton Classic Reserve
1/4 cup Parmesan cheese
2 tsp. parsley
1/2 tsp. garlic powder
1/2 tsp pepper
1/2 cup vegetable oil
4 eggs
3 cups thinly sliced unpeeled zucchini

Grease a 9x9 baking dish and spread the zucchini slices out evenly on the bottom of the dish. Mix all other ingredients together, except some of the cheese - you'll want to add that to the top.


Spread the mix over the top of the zucchini and sprinkle the leftover cheese over the top. Place in a 350* oven for about 40 minutes.

Cupcakes for Dinner

Wednesday, September 15, 2010

I made these with my sister, Emily in mind. She LOVES mashed potatoes. I guess I could say that I love them too, but not nearly as much as her. In fact, I was able to find a mashed potato scented candle for her once - that was the prize of the year, let me tell you. I was dreaming up an innovative cupcake one day. Simply because... well, I was bored. I wanted to create a cupcake that could be eaten for a meal, rather than a snack... so this is what I came up with.

Baked Potato Cupcake

5 potatoes, boiled, mashed
3 eggs, beaten
1 T. butter, melted
1 c. cubed cheese
salt & pepper to taste


Directions:

Combine all ingredients and divide evenly amongst 12 muffin tins.


Fill them as full as you would like them to look when baked, because they won't rise.


Bake at 350* for 45 minutes, or until golden brown on top. Once baked, take out and place on a cooling rack for 10 minutes.


Top with your favorite baked potato toppings... bacon, sour cream, chives, the works.


Eat the whole thing.